Preparing for renders
File organisation
Right from the beginning I planned to show not only some renders of the finished Tower, but to illustrate as well the construction process following the historical timeline.
I thought about doing this as an animation with each frame being joint to a specific construction phase and a specific camera.
At the moment I'm using 30 different cameras illustrating 9 construction phases.
Another important aspect: Since working with lots of repeating elements I decided to use collection instances as far as possible.
So the main element of my project is a collection called "Instancing", hosting all the unique elements which afterwards could be referenced as often as needed.
This is not only the Tower's modules, but as well plants, lamps and lanterns, tools like shovels, ladders, barrows a.s.o., even single stones I planned to scatter over the ground.
Next of course is a collection called "Construction", mainly consisting of sub-collections which represent the different phases. Each of these sub-collections includes only the elements needed at this point.
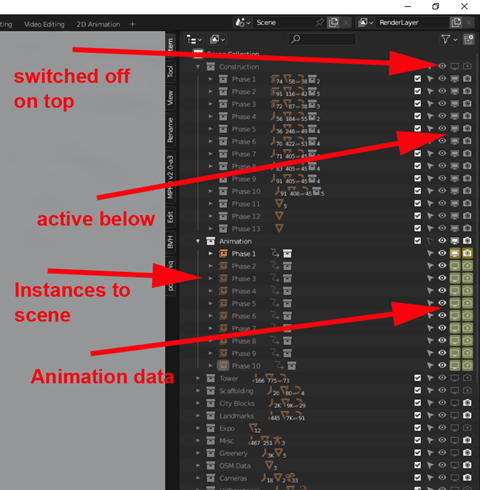
Of course I didn't want to switch viewport/render visibility on and off manually for each render, so my plan was to to animate this functionality. Unfortunately this is not possible for collections.
A little trick helped: Collections can be "instanced to scene", and for those instances it worked.
I organized those instances in another collection called "Animation".
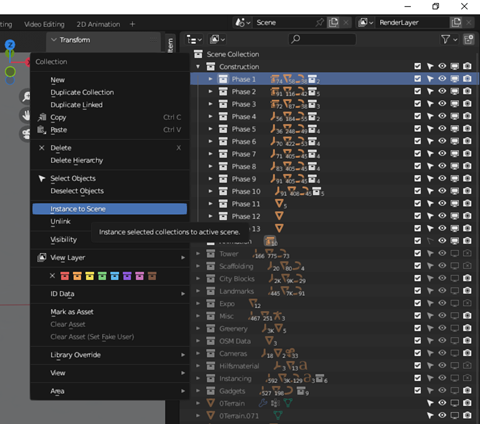
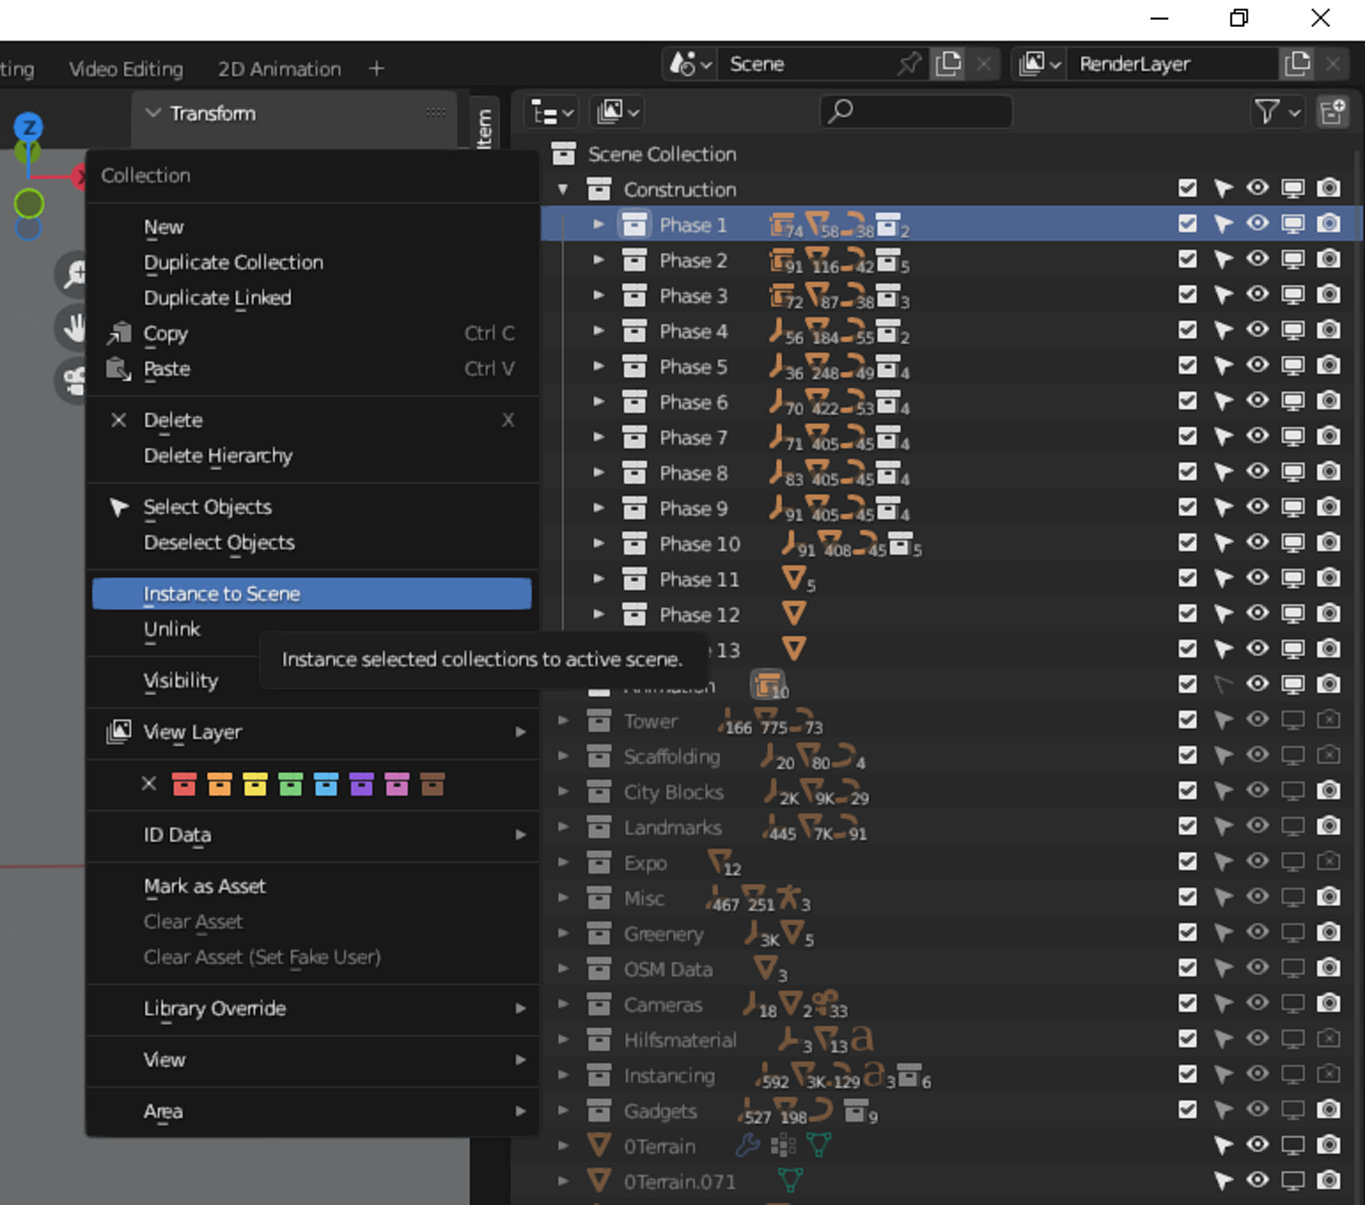
To avoid some unwanted elements in the renders it is necessary to switch off viewport/render visibility on top of the "Construction" collection, but let it activated within:

Another collection called "Gadgets" includes all the nicknack I need to fill my scenery with life: tools, carts, palettes of material... A lot of animations are done there having them visible or not for a specific phase.
Some more collections include the surroundings: houses, landmarks and greenery - this is mainly for having them out of view while I'm working with the Tower.
For the same reason I packed all the cameras into a separate collection.
And one last collection includes the "naked" Tower without any surroundings, but this is mainly for overview and screenshots. It's not needed for the renders - all the elements are included in the "Construction" subcollections as well.
Finally let me have a remark about the ground itself - as you may notice it changes its shape from time to time. I use multiple unique meshes for that.
Depth of field and mist/fog
Depth of field (DOF) means that background elements appear a little blurry. I use it to illustrate the huge dimensions of my scenery.
If you're interested in how to work with DOF you may have a look at this tutorial by Ryan King.
Blender offers another, related feature called " Mist pass", and you may as well like to have a tutorial link: as well by Ryan King.
I use it for the same reason. Of course I didn't want to show some foggy day, so I tried to have it very subtle, just having color intensity reduced a little in the background.
Humans
Some of you may expect to have my renders crowded with humans - workers, passers-by a.s.o.
Originally I planned to do so and started experimenting, but didn't come to convincing results (at least within acceptable time). So pardon me, but I decided to do without.
Generally speaking there are two ways to integrate humans:
- by the use of two-dimensional pics of people, having transparent background (so called "Cutouts")
- or modelling them in 3D as well.
To be honest I do not like cutouts. Main reason is that you can't put them somewhere in the scenery and then do the renders - they have to be optimized for each render and camera setup (might be best to add them in post-render process anyway, and if you have a figure partially hidden by some foreground elements you'll have to work with lots of layers and transparency a.s.o...) To me it's a bit of bottle neck: turns my 3D work into 2D.
And lastly you won't be able to get some good cutouts dressed in 19th century's style ;-)
The better way would have been to model them in 3D, and that's what I tried.
There's a really good Open Source software called Makehuman, and it can as well be integrated in Blender (MPFB2). You'll get some really convincing results with only few mouse clicks.
Anyway I wasn't too hot to define natural looking poses for hundreds of workers, so I tried to do something using Motion capture (Mocap). There are some free ressources on the Internet as well (just have a look at the cgspeed site). Unfortunately this stuff seemed to be not compatible with the MPFB2 rigs...
As said on the Makehuman website: importing BVH files isn't implemented yet.
I could remember succeeding with some older version some years ago, and I tried to re-setup my former environment, even re-activated Blender 2.79, but wasn't successful. (I suspect that some of the old scripts are broken meanwhile.)
Lastly, after loosing a lot of time I decided to do without.